F Marisa Dahl: 2015

Monday, November 23, 2015

Get Ready for Hour of Code

I am excited to share my robot book with you to prepare for the Hour of Code. During Hour Of Code Week students around the world will have the opportunity to learn about computer science. For more information about Hour Of Code. check out code.org.

For more computer science activities for ages 4 year olds - High Schoolers check out this list of resources or this list of resources.

Preschool students and Kindergarten students will enjoy reading this book about robots. Check out the photos and links below. Click here to download it from my store.


Be sure to check out the Robot Guided Reading FREEBIE Book! Click to download from my store


Enjoy!

Sunday, November 15, 2015

Sight Word Donut Bundle with FREEBIE

I am excited to share this donut interactive guided reading bundle. My daughter's birthday is donut themed so I put together a packet for you, and your students to enjoy!

Kindergarten Sight Word FREEBIE


Kindergarten Sight Word Donut Bundle


Includes 4 books: 1 easy reader with dots for voice print match, 1 easy reader with no dots, and 1 harder reader. Also includes comprehension questions, sight word fluency strips, sentence structure practice, and like sight word practice sheet.

Wednesday, October 28, 2015

Engaging students in Creativity | #SuperherosAreReal - Taking Risks & ITEC 2015

We ask our students to take risks every day, many times we may not even know they are taking risks. I also ask teachers to take risks all the time. So I knew I had to model risk taking.

This year for ITEC (Iowa Technology Education Connection) Conference I took a risk. I wanted to have participants to be creative. When teachers experience being creative they remember what it like to be creative as a kid. I had 45mins to explain why it is important for students to be creative and share a few creativity resources, which isn't a lot of time, but I wanted to make sure I left enough time for explore/play time! I didn't want the participants to feel like they were drinking from fire hydrant, instead I wanted them to play in the splash pad!

Participants were asked to create a superhero who resembled the strengths they felt that had. My examples is below. If I was going to ask a room full of teachers to do this, I had to model one.


Unfortunately, the internet wasn't working well during my session so many people couldn't participate but a few didn't give up, they tweeted theirs out later using the hashtag #superherosareread. I even had an educator share that she was taking a risk today after going to my session a few weeks ago.

That wasn't the only risk I took during this session, I also wore an Avengers Shirt, instead of my usually professional attire, if I want to go all out maybe I will wear the cape and everything next year.

Here is a link to the presentation: bit.ly/ESCitech1

 Engaging Students in Creativity ITEC 2015

The newest creativity app that I learned about when putting this presentation was Drawp, you have to check it out! You can set up student accounts and link it to each student's family members so they can receive artwork with a simple swipe. (not an advertisement)

Are you taking risks? Are your students encouraged to take risks? Are your teachers encouraged to take risks? 


Wednesday, September 23, 2015

5+ Fall / Autumn activities that integrate technology


Here are 6 ways to integrate technology into fall activities in the early childhood classroom. Depending on your comfort level using technology in your classroom there should be something for you.

** Remember it is important to always start with an instructional goal for meaningful technology integration. Think about your GOLD Standards or Iowa Core Standards before implementing one of these.  If you are familiar with SAMR some of these are substitution but it is a great place to start!

1. Create a StopMotion video that goes along with the book 5 Pumpkin On a Gate. Or describe the life cycles of pumpkin or apple and have the student describe the life cycle,

2. Take the device (iPad, iPhone, Android Tablet) outside to take pictures of fall things in the classroom. Put the objects in a science center along with printed pictures of the objects for students to match to the correct word/1st sound/Number Match.

3. Use ChatterPix Kids to describe the fall items, or tell a story about the object.


4.  Create a pumpkin using the Carve a Pumpkin app by Parents Magazine.


5. Check out the Fall/Autumn books on the Epic app/website. (Free for educators!)
      Kitten's Autumn By Eugenie Fernandes Ages 2-4 Read To Me book
      How Do We Know It Is Fall? By Molly Aloian Ages 7-9
      Leaf Jumpers By Carole Gerber Ages 4-6
      Fall By Emily C. Dawson Ages 5-7 Read To Me Book
      Lost in the Corn Maze By Precious McKenzie Ages 4-6 Read To Me Book

6. + And one more.... don't forget about what YouTube has to offer (if your school allows you to access this)
Fall YouTube videos
      Autumn Leaves Are Falling Down
      Autumn/Fall videos for Kids and Toddlers - Reading
      Question and Answers - Why Do Leaves Change Color In Autumn - Kids Video Show
       Fall and Autumn Counting Song for Kids - How Many Leaves? by ELF Learning
      5 Little Pumpkins Sitting on a Gate: Halloween Songs for Children


Happy Fall!


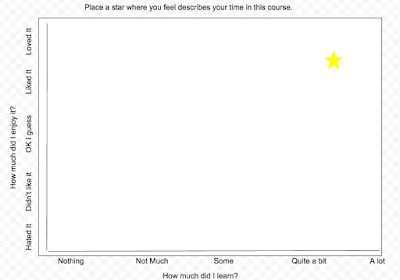
Scatter Plot / Correlation Graphs using Google Draw


Need to get quick feedback to evaluate the relationships between different factors? Need a scatter plot or a correlation graph, don't have paper, dot stickers, or time? Maybe you aren't meeting face-to-face? Here is a solution!

I saw a colleague use paid software to do this digitally, well at 1:00am last night I had a grandiose idea of how I could use Google Draw to do the same thing, and it is FREE!


Scatter Plot to gather feedback.

Click Here to go to Google Draw

Scatter Polt used for a pre & post assessment.


I am looking forward to using this in upcoming learning adventures. I love learning new ways to use GAFE. 

#nomoredotstickers


Thursday, August 20, 2015

5 Student Google Basics for the Beginning of the Year

There are 5 practices that are helpful to put in place at the beginning of the year to ensure Google Drive and Gmail management for the teacher and students. Even if teachers are using Google Classroom, students may need to know these basics.


1. Show students how to access Drive.
2. Show students how to access their email. (If email is setup for students.)
    2a. Send an email (Have the students send the teacher an email so they have your contact information in their Contact List and they know how to send an email.)
    2b. Reply to an email.
    2c. Create folders in Gmail.
3. Show students how to create folders in Drive. LINK HERE
4. Show students how to create documents in Drive.  
     4a. Name documents (See example below) Students need to be taught how to label documents so they can be found easier in their Drive and your Drive. This will prove to essential as the school years go on and especially year after year.
    4b. Share files with the teacher.
5. Show students how to access Google Drive Offline. (Only if the students are allowed to take their Chromebooks/computers home) LINK HERE to the tutorial.

Here is a helpful template for students to use to name documents. CLICK HERE for a printable version.


Here is a video on how to pack up your Chromebook.


Wednesday, August 12, 2015

What I Wish I Knew Before Becoming an Instuctional Technology Consultant


A year ago I switched from being an Instructional Literacy Coach to an Instructional Technology Consultant. In my new role, I am able to follow my passion for technology integration while working with educators in all content areas. Here are ten things I wish I’d known a year ago.


1. PLAN, PLAN, PLAN! Over the last nine months I have spent more time planning than working face-to-face with educators. We have to get to know each other to build a relationship (see #2), discuss goals/objectives, and determine our action steps before we can be effective in our learning together. This isn't much different than working with five-year-olds. If you do the upfront planning well, the work with the students goes smoothly and ensures that the participants will be doing the “heavy lifting” of learning.


2. BUILD RELATIONSHIPS - We must build relationships before we can help educators learn. I am not one to partake in small talk, however, I have seen the importance of taking the time to get to know someone. We have to show them you care.
Example of Small Talk - “Wow, it is warm out.”
Example of building relationships - “It was so nice outside yesterday, did you get a chance to enjoy this nice weather?”


3. Have SHARED GOALS - While working with other educators you must be working toward a shared goal. Without a shared goal, it turns into forced collaboration with no vision or direction. This won't have much of effect on student learning or systems improvement. Along with the goals, each participant must share consensus.


4. Understand INTEGRATION - We must see the integration between all of the standards. Educators need to see be able to see the big picture, it helps to see how all the standards work together. If you don't know the big picture you can get lost in all the standards. For me, reading through the College and Career Readiness Anchor Standards and the Note on range and content of <<enter subject>> which can be found on the same page, on the right has really help to put the grade level standards together. Also, reading one grade below (there are preschool standards for those Kindergarten Teachers) and one grade above helps to see where the student is headed once each skill is mastered.


Learn, analyze, and understand the BIG PICTURE!


5.  Be CREATIVE - I use to think there was one right way of doing our job. I strived for months to do it the "Right Way". However, it left me in a box and most of the time, frustrated. Once I realized there is more than one way of doing our job, I have been so much more creative in my position and it has brought much more satisfaction in my job. I look forward to each day, each conversation, and meet-up with colleagues because they push me to be better. I can bring ideas to the table and they help me run with it. I truly believe innovation happens in isolation but collaboration around those ideas is what takes an idea from bring just that to an extraordinary reality! We offer each other support, encouragement, confidence, and also criticism when needed.


6. FAIL OFTEN, FAIL A LOT. I have learned SO much more from my failures this year than I have from my successes. I look back at my experiences this year and I have grown so much as a learner from the experiences that didn't go so well, or as planned. This has made the future learning experiences that much better. Failing shows you are trying. How many cooks/bakers do you know who have a perfect recipe the first time? I am glad I have the support from friends and colleagues who are there for me when I fail and can pick me up and remind me that failing is ok. Do we encourage teachers or students to take risks? Or do we discourage failure to the point that we discourage risk taking? I am glad that I feel safe to take risks, and I feel I have to in order to be creative (See #5) and improve in certain areas (See #7).


7.  Be a TRUE LIFELONG LEARNER - I am ADDICTED to learning more. I can't get enough both in my personal life and my professional life. MindShift has been an addition of mine lately. I can’t get enough of their articles, how they push my thinking. I also enjoy learning from my other college and connecting with others who are in the same field. A year ago my mind was spinning on how to do this job, and do it well. I searched and searched the Internet for blog posts, articles, ect.... but no one could really spell it out. As I attended more Instructional Coaching learning opportunities I feel I have gained more knowledge around how to be a better Instructional Technology Consultant. That being said, I can’t wait to sit down and reflect on the 2015-2016 school year to see how much more I have learned.


8. Understand DIFFERENTIATION - This is a strategy I continue to work on each time I work with educators. While I feel it is necessary to differentiate it is VERY difficult. Just like being in the classroom but instead it is with adults.  I enjoy working with educators who have a Growth Mindset (link to book). They can manage their own learning during our work time. However, there are educators who feel more comfortable with the sit-and-get so differentiation doesn't work as well because they aren't as comfortable doing the heavy lifting. A few things that have helped me do this is ask for help, whether it comes from others on your team, in your building, across the table from you, ect. Usually I can find someone to assist me so I can help move the majority of the group along, while the others can receive the support they need. The same holds true in the classroom, even in Kindergarten we had a Computer Expert, someone who showed expertise with the computer who could help another student before asking me (the teacher).


9. Have TIME MANAGEMENT - While preparing for the week, sometimes the month, I have to prioritize each step. This is a new for me. I am usually a fly-by-the-seat-of-my-pants kind of girl, but that doesn't work in this position. Some days or not-so-many-weeks are slow, and some MOST days/weeks are FAST. You have to be able to manage both.  I am also a HUGE multitasker, believe it or not if I am not doing two things at once it is difficult for me to listening or pay attention. For example, if I am listening to speaker I have to be typing notes, searching for more information, ect.... Otherwise, I find myself daydreaming. My mind is use to going 150 miles per hour as a Kindergarten teacher, when it goes 10 miles per hour it doesn't know what else to do so my mind daydreams.  


10. Have FUN! Why not! (keeping this one short and sweet!)

This is a follow-up post from last year What I Wish I Knew Before Becoming an Instructional Literacy Coach.

Wednesday, June 17, 2015

GAFE 101 Course Resource

Hello, Blogger-verse Friends!

I wanted to share the slides from my GAFE (Google For Education) course last week. This was a very basic course for educators to learn more about Google Apps and how they can use them in their classroom. I received wonderful feedback, so I thought I would share. This is not intended to be a stand-alone resource, we used work time, and discussion to accompany this resource.

Current as of 6/15/2015  UPDATED LINK ***

 Link to Resource


Have a wonderful day!


Friday, May 29, 2015

ABC Videoes linked to QR Codes


**UPDATED** Get this for $1.00! It is over 10 pages so I have to put a dollar amount on it. **


Do you have tablet devices (iPad or Android) in your classroom? Are you looking for more ways to have students use them during independent work time? Do your students need practice with their letters?

If you answered, YES, this is a wonderful resource for your students. Each letter of the alphabet has a QR (quick response) code that is linked to a video from YouTube about that letter. Follow these quick easy steps and you will have an ABC Center ready to go in no time! Perfect for the beginning of the year!

1. Print file on card stock. DO NOT laminate, the QR codes will be harder to scan. Some plastic sleeves work, you may have to experiment a little bit.
2. Download a QR Code reader on the device. (Apple Store QR Reader / Android QR Reader) You can also ask Siri "scan QR code and you can do it with out downloaded an app".
3. Place activity in a center. Your students may need a lesson on how this work, along with time to practice with adult assistance.
3. Students scan the QR code and watch the video about each of the letters.


Extended Ideas:
 Once students know their letters they can create their own letter videos, songs, and posters.

Follow me on Facebook. Share my post and I will send you this resource for FREE! Comment with your email address and which device you have in your classroom. I look forward to connecting with you.

Note: If YouTube is blocked at your school these links will not work. You could send these home instead to have students watch if they have access to devices and internet at home.
There may be ads that are shown before the videos, or pop-ups over parts of the video. It is always good practice to view the videos beforehand. When I went through the videos, only one ad was shown, I was able to watch the other 26 without any ads. I don't have control over the videos and ads.


Thursday, April 23, 2015

Zaption, EduPuzzle, edCannon: What is the difference?


**UPDATE** Oct 20th, 2016 - Zaption was bought by edPuzzle, Zaption no longer exists.

Many of you may have heard of one of these or maybe even used one of these assessment tools. When I have worked with others teachers on one of these tools I often get asked about how it compares to another tool like it. What does that one do that this one doesn't? Which one do you recommend? Have you heard of this one? Why that one? I could go on and on.

Anyway, I did some research on the top three that I get asked about the most. Click on the blue links to go to a complete description of what is available for each version.


Public Search Access
Collaborate with colleagues
Grade Report Download
Limitations on free version (As of 4/23/15)
FREE
NA
FREE
Few “extras”, app available, can be embedded into a website
FREE
Paid
FREE
Up to 6 “questions” per video, must create “tours” on computer, app available
Paid
FREE
Paid
Up to 8 classes, no app, web based only

I have used Edpuzzle and Zaption the most because I like the public search access that is provided on the free version. I can watch "tours" (this is what Edpuzzle calls their videos with questions embedded) others have created, and use the same, or edit it if I want. I have found that Edpuzzle is the simplest, easiest to train and useEdpuzzle also allows you to leave an audio clip in the "tour".


These are all great websites to gather feedback from students. Here are a few ways I have seen teachers use them:

1. The teacher assigns the video to watch before class to free up instruction time and/or set the stage for new learning.
2. The teacher has prepared a video with questions to show while she is absent from class. The substitute plays the video and the students get the content while the instructor can receive feedback from the students.
3. The teacher shows the video during class and can gather feedback from EVERY student.
4. The teacher shows the video during class but then has a classroom discussion when prompted with a question.

I would love to hear your thoughts on these tools, or other tools you use for assessment. I am looking forward to teaching a course on formative assessment using technology tools.

Have a wonderful day! Thanks for reading. Be sure to follow on Facebook, Twitter, or by email using the link on the right.


Thursday, January 22, 2015

I don't want to lose my FitBit again! Here is what I created!

Do you have a FitBit?
Has it fallen off?


I had a problem, I lost my FitBit one morning and I was VERY upset with myself. I also found myself unmotivated to park a few spaces further because it wasn't like I was counting steps anymore. I didn't realize how a little piece of rubbery-plastic with a glorified pedometer on it would motivate me to walk a few more steps.

I have had my FitBit for about 7 months. I wasn't as competitive, then, as I am now. I joined the Fitbit Challenges using the Fitbit app, a Work Week Challenge and then a Weekend Challenge. I found myself being a bit more competitive being around such great people in our new neighborhood who are active and very supportive!

SO, you can see why I was so disappointed when I thought I lost it. (I ended up finding it in our home, which is another story in itself.)

SOLUTION: I needed something to keep the clasp together. I found a few ideas online that were a bit too expensive for something so little. Backing up a few months, as an Instructional Technology Consultant I heard a lot about 3D printers, saw a few, been awed by them, but never thought I would learn to actually use it. I made a goal that by Spring Break  I would learn how to use SketchUp and print something on the 3D printer. I told a colleague about this one day and she said "well download SketchUp". So, I did. I spent the rest of the day creating and then a few hours .... sad to admit... figuring out how to convert the file to an STL file because that is what our 3D printer needed to print my product. It was a Friday, and I don't like leaving projects undone, but I had no choice.

...fast forward 4 days, Thursday. I, finally, got my product completed... for now. It isn't final, because I want to improve it by putting some more details on it, but I need to find someone who has some more knowledge of Sketchup then I have taught myself already.

Here is a picture of my first few drafts. The very first one was the best, then I stopped measuring and estimated (not recommended.) I learned more about millimeters designing this then I remember from grade school.)


The middle one was my first attempt. I like this photo because it shows my thinking and learning about Sketchup. 


My latest attempt. 

A big thanks to the Creative Services Department at Heartland Area Education Agency for putting up with me and helping me through this process. 


Up next I will share the file and screenshots of my project. 

Happy learning, happy making!


Tuesday, January 6, 2015

Invent to Learn -Part 2- Tinkering is much like Writer's Workshop


This is Part 2 of my book review on Invent to Learn by Silvia Martinez. Here is  a link to Part 1 Link Here


Part 2:


"The role of the teacher is to create the conditions for invention rather than provide ready-made knowledge. - Seymour Papert. Invent to Learn pg158.


Tinkering is much like how my teacher partner @JHoulahanP and I ran writer's workshop in our kindergarten class. The acronym, TMI, was explained in the book Invent to Learn, in Chapter 3.


TMI


T= Think
Students followed the structure of thinking about something you have done, want to do, or share, and write about it.


M= Make
Students then drew a picture and wrote about the picture. They "made" their story. With minimal teacher distractions, students were expected to get their idea on paper. They were asked to draw a picture, label it, and write words that told their story. They had to be able to share this with a peer, who would help them improve it.


I=Improve
Throughout the year the expectation was to improve their writing. They had to re-read to make sure they could read it themselves before they could share it with someone else. When they shared it with someone they were supposed to help them improve their drawing and writing to help the reader better understand their writing.


And another aspect that was much like our writer's workshop was that WE WERE NEVER DONE! Their writing was either in progress or ready to publish. When they were done with one piece of writing they could get another piece of paper and start another story. The expectation during writer's workshop was that students were either writing, drawing, editing, or sharing.


There was curriculum we covered throughout that process, but we never assigned grades, it was kindergarten so that isn't unusual, we rarely told them what to write about it, we did have "challenges" such as a "How To" unit and an "All About Unit," but there were little, if any guidelines.


In comparing these two ideas, Writer’s Workshop and a Makerspace, I was able to make connections to the importance of the learning environment. The environment the teacher thoughtfully and purposefully structures is essential to facilitate childrens’ learning. The students are responsible for their own learning, in the setting their teacher has created, with careful guidance and facilitation from their teacher.


After making this correlation, between the writer’s workshop structure I led my kindergarten students in, and the ideas of a Makerspace, I am able to  better understand how Makerspaces work, and how building a Makerspace on a stable foundation with purpose and learning in mind is essential for student learning and success.

Quotes worth tweeting:

"The deepest problem for us is not technology, nor teaching, nor school bureaucracies - it's the limits of our own thinking." Invent to Learn pg56.


"When the risk of making a mistake is costly, it makes sense to use the waterfall method. However, if the risks of making a mistake are not expensive or dangerous, then it makes sense to explore different design methodologies." Invent to Learn pg 47.


Further Reading:
http://www.eschoolnews.com/2015/01/02/top-10-libraries-239/?


Monday, January 5, 2015

Invent to Learn- Part 1 of My Virtual Book Club Learning Series

"It will go away, it is a fad."
"It is all junk in a corner."
"We need structure not a free for all."
"How can it be assessed."


Do you want to build a Makerspace/innovation corner/tinkering room...or whatever you’d like to call it? I’m sure you’ve heard of many of these ideas, or you may be thinking them yourself. This isn't an area I am familiar with {yet}.


While I was at ISTE last summer in Atlanta, GA, I forced myself go to sessions that were out of my comfort zone. The theme of the conference could have been "PLAY."  The stress on the importance of the concept of “PLAY” was evident throughout the entire three days of the conference.


Fast forward six months and I am still yearning to learn more about this “innovation space” concept. So I picked up the book Invent to Learn by Sylvia Martinez for my winter break reading.


Here are my additional thoughts and key ideas as I read the first few chapters of the book.


Making/tinkering is not new. Did you ever build a paper airplane or a cootie catcher in grade school? (If you don't know what a “cootie catcher” is I provided a link, or if you’d like to make one.)


Farmers are tinkerers, hunters are tinkerers, and they are not taking part in any “fad.” A friend of mine, whose husband likes to hunt, has built his own quiver (a bag that holds arrows) out of an animal he hunted. He wasn't doing it because it was a fad, he was doing it because he needed something and wanted to build it himself.


Again, making/tinkering is not new, and I can't believe that it would be referred to as a fad. Would anyone refer to math as a fad? I would hope not. So instead of saying Makerspaces are a fad, we could say we are incorporating more self-exploration into our day by providing a place where students can invent, make, and tinker. Having a Makerspace in a school is not a place to go to fill-up time it has to have a purpose. Much of the school day is standardized, if you don’t like that, make the time that isn’t, just like we have a set math/science/music time. “If you are choosing to teach X, you are choosing to not teach Y, make X count!”


Everything in moderation, from standardization, tinkering, assessing, physical activity… we don’t want students to be sitting all day, recess all day, looking at a computer screen all day, we need to evaluate the whole package that makes up a students’ day.


Students need time in a school day to think past the academics and go/do something that has no rubrics, guidelines, grades, or rules. Google wasn't created in a classroom with a teacher in the front, it was created in a garage with people innovating. Most of the technology we use every day, and depend on, was created by people doing what they wanted to do because they had an idea to create/make/tinker, not to do something they were asked to do or told to do using guidelines, instructions, or rules.


Here a few quotes to think about:


"Personalized learning is redundant. All learning is personalized! Always!"


"Every child needs access to tools, knowledge, and problem-solving skills."

Back to reading.... Part 2 coming soon!

Please let me know if you have additional resources that helped you create a Makerspace or implement an Innovation Time in your class. I would love to see what you are doing. What do you think of Makerspaces?